Thursday 27 September 2012

Thought : Biking Experiences

"Dear Andy, thanks for sharing the valuable information and nice pictures of your bike with us. Do you have any other bikes that you can post so that I could download and make them as my desktop's wallpaper too? Also, I have been thinking of getting a bike after reading through all your postings so far. Do you think I can go for the ER6F 2012 or should I start with the Ninja 250/300 first? Hope you can help clear my mind. Thank you. Regards, Chong, Country Heights"

And here's my reply :

Hi Chong,

Thanks for your kind words and I am just sharing what little knowledge I have with my readers here. Hope other riders or sifus could chip in and enlighten me and fellow readers on more knowledge too from time to time.

Sharing is caring!
I gathered from your posting that you may be a new rider. I know of some riders whom purposely go for bigger cc bikes so that they may not need to face depreciation in the value of the purchased bike as they upgrade from smaller cc bikes to higher cc bikes in the near future.

However, IMHO, riding a bike is like every other learning experiences. We learn to crawl, then walk, then run, then swim and so forth. There are some riders whom have in-built talent whom could take on biking like ducks to water. For the rest of us, it may be a good idea to start from a smaller cc bike and gradually move on upwards.

I started from my father's Yamaha Y80, a nice little bike that I grew up with. I remembered polishing it on weekends to bring out whatever shine there still was in the old bike, and I loved riding the small bike around town. Well, not to say that I have more choices anyway as we were not well-off families but my folks are as honest as the day, and I made do with whatever I have access to at home. And I still ride this grand o' bike from time to time.


After I came out to the working world and slowly climb up the corporate ladder, I started to go back to the world of biking after securing my first car and house. As you could see, I made sure that I covered the priority bases first; then only did I indulge in my hobby.

My first real own bike was the Kawasaki ZX2R, which was all the rage those days. It was a nifty sporty bike- often referred as the baby superbike, because it had the looks of the bigger ZXR superbikes minus the torque and top-end speed. This, along with the Aprilla RS250, were the most sought-after baby superbikes of their times then.


Over time, I began to appreciate easyriders that were plying the roads of KL for their ease of use and easier riding position. I tried my hands with the entry level Kawasaki Eliminator / Vulcan 250, which shared the same engine as the Kawasaki ZZR250 sports tourer; and found that it was a really easy ride.


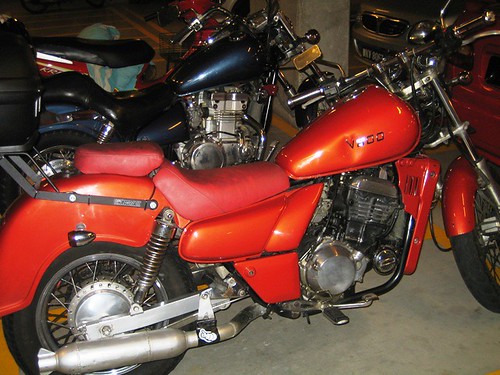
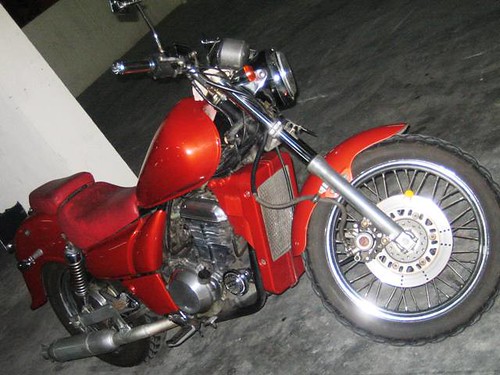
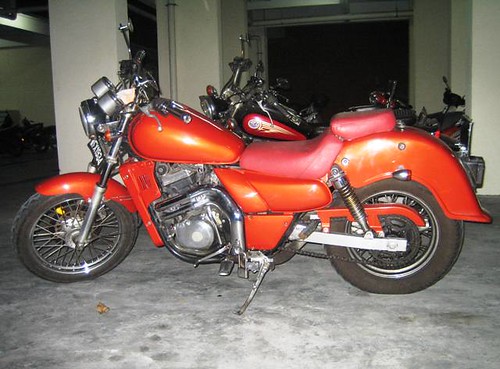
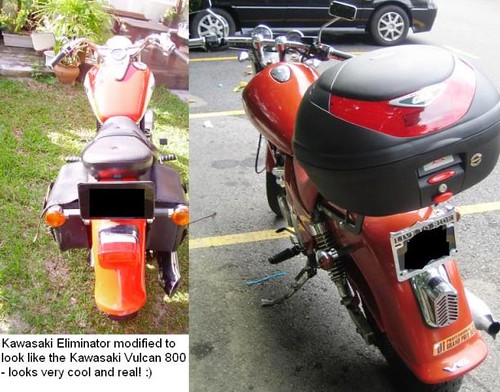
No longer do I have to crouch in the racing position just to get the wind-in-my-face experiences; and it soon became my preferred ride. As with the Vulcan of its days, one would began with the 250 before moving onto the 800 somehow. Irregardless of the capacity, with the exception of the heavier weight on the latter, both Vulcans were nice rides, especially during convoys on the highways.


And these days, sportsbikes and easyriders are taking a back seat to the newer genre of naked bikes and sport touring bikes. The sport touring bikes combine the best of both worlds- you get the aggressive looks of the sportsbikes and the easier riding position of the easyriders. I would have liked to get my hands on the Kawasaki Z1000SX with OEM panniers; but was relatively concerned about the very torquey engine and top-end speed for my relatively new riding experiences.


The next best option would thus be the Kawasaki Ninja 650R in CBU guise, and the rest is old waters under the bridge. I must say that it has been a great riding experience on the Ninja 650R, and it has an engine that is willing to pleased with good torque for town-riding and relatively high speed (220 km/h in stock standard form) for highway riding. I know many novice riders whom graduated to the Ninja 650R direct from mopeds; and the forgiving nature of the bike ensured that these riders remain safe and sound to enjoy their bikes on a daily basis.


So, Chong, the choice of your bike is really entirely up to you; but always remember to get a good set of riding gear to ensure a safer and more enriching riding experience on your new bike!

Let the good times roll, mate!


Monday 24 September 2012

Sold : 2012 Digital Gear Indicator

I read from reviews that the above digital gear indicator has been used by many bikers overseas; and since it utilises the latest 2012 technology, it is said to be thinner than the yesteryears' gear indicators (like the Acumen DG8 that I have just installed on my Green Hornet last week).

I ordered a unit online and waited for a few weeks. So last week, when there was a unit of Acumen DG8 available locally, I just bought it over first and had it installed in good time. The gear indicator has been useful in my general riding actually.

And today, the set of 2012 gear indicator arrived vide parcel. The delay could have been due to custom clearance or shipping arrangements; but I now find myself having an additional unit of gear indicator. I would have preferred to install this unit since it is newer and thinner; but it would be quite a bit of hassle to uninstall the Acumen DG8 and replace with this SBS Moto Racing 2012 unit.

Anyone in the market for a new digital gear indicator, please feel free to drop me an e-mail with an offer.

Win-win situation for all, mates!

PRODUCT FEATURES:
Super thin display designed with high technology
Indicates gears from 1 to max. of 6, as well as a neutral indicator
Auto programming
Compatible with all motorbikes, four wheelers, dirt bikes etc. - will fit anything with a shift lever
Blue/Red/Green/Yellow illuminated display will automatically dim at night
Detects the current gear faster than other gear indicators that use speedometer/tachometer signal

HOW IT WORKS?
A small magnet mounted on the gear shift lever,which moves past the upshift and downshift sensor as shifts occur.
The shift signals are then sent to the display, where the current gear number is shown.

INSTALLATION GUIDE:
Black cable is for _ 
Red cable is for + 
White cable is for neutral
Yellow cable is for 1st sensor cable 1, green cable is for the 2nd  sensor cable 1
Blue cable is for the rest cables of sensor 1 and 2 together.

INCLUDED KITS:
Two sensors with four cables
One magnet
One display
Installation guide


Sunday 23 September 2012

Modular Helmet Consideration : Nolan N90 N-Com @ USD 230

Modular Helmet Consideration : Speed and Strength SS1700 @ USD180

Mod : Installation of Acumen DG8 (part 2)

There would be 2 parts to this article. Part 1 is the adventure and thoughts of getting this useful gadget installed on Green Hornet this afternoon, while Part 2 is the blow-by-blow installation process as described by the Master Shifu ie Geek himself.

DIY Installation Guide


Most kawasaki bikes don’t come with gear indicators (for some strange reason, probably cost). So every now and then we’ll face this ‘Seventh Gear syndrome’ where we tried to upshift even after the top gear (most bikes have 6 gears). But the more dangerous one is the ‘First Gear Syndrome’ especially during tackling the twisty roads on the hills. This can cause rear-tyre locking (not to mention destruction to the transmission and the engine), and potentially fatal if you fall off at the wrong time.

After the roundtrip to Genting Highlands recently (for early breakfast), I realized how important it is to have some kind of indicator to remind you which gear you are currently on. Usually I can keep track of the current gears in my head, but during very high concentration on the twisty hilly roads, I lost track. Yes I have a one-track mind. This is why I can never work in McDonald’s drive through counter. I will go crazy.

Let’s get on with it shall we?

Of course, before I start, I need to know how this thing works. After reading through the website and some reviews, this unit have a microchip inside it, that actively compare engine speed (RPM) and the road speed (kmh or mph) and then determine what gear you are in. Since all bikes are made differently, this unit needs to be taught two things in the beginning – 1) the amount of gears the bike have and 2) the ratio of each gear. I know it sounded complicated, but trust me it is easier than I thought. I’ll cover this one at the end of this post.

What I was looking for is the wiring diagram for my bike. Good news is, it can be done right by tapping cables off the bike’s cluster harness (yay for not needing to lift the fuel tank to access the harness beneath!). Here’s the wiring reference chart:

Seems simple. The Acumen DG8 wiring chart:


Things looks very simple so far. As recommended, connections are to be soldered to avoid bad connection, causing the unit to freak out, or worse, malfunction. So I start to heat up my soldering gun while I take off the bike’s front. I only need to take off the windsheild and the dust cover behind the meter cluster on my ER-6F.

First, where do I mount this? There’s four possible locations:

1) Either at the left or right of the meter cluster.
2) Below the meter cluster
3) Above the meter cluster
4) On the handlebar (it fits snugly between the clamps).

The first location requires some dremel work on the stock covers. Since I don’t want to cut or drill through it, I decided that I don’t want to mount it here. Mounting it by just sticking it on top of the panels are also not a choice since the cable runs from behind the unit (so it needs some drilling work).
Below the meter cluster could work. I’ve seen this being done. It’s a little tricky as the unit itself is almost an inch thick, and the cables that runs through the back of the unit will need to be bend 90 degrees down. Definitely not something I am comfortable with.

The handlebar one looks cool, but it might be tricky to manage, since I’m going to connect the cables to the meter cluster wiring harness, it might pose some difficulty should the bike needs any disassembling works.
So in the end, I decided to mount it on top of the panel. I test fit the unit with the windsheild on, and it fits perfectly with ample clearance.


I’ve mounted the unit on top of the cluster, and runs the cable through the gap behind it.


Now time to get dirty. Here’s the lead ends from the Acumen DG8 unit:


Here’s the mid-connector. Handy for any reason to disconnect the unit lateron.


Next, I start cutting the stock wires from the meter panel and solder on the wires to the Acumen DG8 unit, according to the diagrams above. Once done and tested the unit to be working, it is time to tidy up the cables and secure them properly so they don’t dangle.


Once that is done, it’s time to calibrate the unit.


Calibrating the unit is really easy, all you need to do is to switch the unit to ‘Learn mode’ by inserting the special pin into the programming hole at the back of it, and press it for about 10 seconds, until the word ‘L’ appears on screen. Make sure your bike engine is started before you do this.


Once it is in ‘Learn Mode’, insert the programming key again, and press for 6 times (until the number 6 appears on screen). This is to tell the unit how many gears your bike have. The ER-6F have 6-speed transmission, so I press it until ’6′ appears.

Wait for about 5 seconds, and then the display switched to a blinking number one ’1′. Get on the bike, switch it to first gear, and run it for a while (maintain above 4000RPM for best result). After a while the display will turn into ‘Three line’ and it will show number 2.

At this point switch the bike back to Neutral, and make sure the ‘N’ appears. Now switch the bike to second gear, and run it through until it shows ’3′, switch to 3rd gear, and so forth until it finishes at ’6′. After this the unit will save the gear ratio information and it is ready to operate normally. I manage to get the calibration done within 500 meters of travel. The original plan was to prop the bike on a paddock and run the gears, but I don’t think that’s a good idea, thanks to the loudness of the Arrow Slip-On that I’ve installed recently.

The verdict

Since this unit relies on ratio calculation, it will only manage to tell you exactly what gear you are on when the clutch is fully engaged, and it will take a while depending on how much signal does your engine send to the display.

So now at least I will know what gear I am currently in, and will not downshift excessively, causing potential injuries or endangering other road users, as well as the durability of the bike’s transmission and engine.

Mod : Installation of Acumen DG8 (part 1)

There would be 2 parts to this article. Part 1 is the adventure and thoughts of getting this useful gadget installed on Green Hornet this afternoon, while Part 2 is the blow-by-blow installation process as described by the Master Shifu ie Geek himself.


Anyhow, readers would know that I was at KS Motorsports earlier the week and Ah Ho was supposed to install my newly-acquired Acumen DG8 ("AGD8") digital gear indicator. However, as it was quick packed on the evening that I went, he asked me to try again on Sunday if I was available, as the process would take approximately 2 hours.

I have read some DIY installation guides online, and it sounded quite doable actually. Geek aka Firdaus, was one of those whom published his DIY installation process; and he recently decided to assist other fellow riders whom wanted to do up anything electronics about their bikes, for a small fee.


I thought that it would be good to catch up with Geek over the afternoon, as we peruse over the installation together. Add to the fact that he has previously installed the ADG8 on his own bike and told me that it should be doable in less than an hour, meant that here was someone who knew his stuff. I made an appointment with Geek and rode over at 2.00 pm.

The journey from Sri Hartamas to Kota Damansara took longer than expected; partly because I was new to Geek's housing garden and partly because I had installed the side panniers for my weekend rides, so I was unable to cilok-cilok easily between cars during stretches of traffic jam roads.

Reached there at around 2.30 pm and the guard asked if I was going to the rumah motor besar. I replied in the affirmative and he directed me over.

And sure enough it was the rumah motor besar, or rather rumah motor-motor besar. There were other riders' bikes there for electronic installations too and I counted no less than 4 units of Ninja 650R (including Green Hornet), 1 unit of ER6N and 1 unit of Z1000. The Z1000 was there for the installation of the ADG8 and when I arrived, Geek was already programming the unit and shortly, it was good to go.

By the way, it was a really attractive Z1000 in a gold and black colour scheme; with a very friendly owner, Heck, everyone at Geek's place was really friendly actually. It must be a prerequisite for one to get services at Geek's place- that you must be a friendly and humourous chap yourself.

Green Hornet meeting up his counterparts!
We owners catch up with each other; well, the bikes between themselves too!
Master Shifu hard at work.
See, he's smiling even as he was soldering them wires! Now, that's service with a smile :)
Mine was next in line and Geek clearly knew his stuff. Stripping off the MRA Germany windscreen, he worked swiftly to cut the stock wire and soldered on the ADG8's. About 20 mins' later, all was done and he took the bike out for a spin, and gave the thumbs up.

How much did it cost? I'll leave him to update you himself. He's a real friendly chap and you can reach him at +6012-229 2185. The service fee that he charged was well-worth the price really. Two thumbs-up from me!

This is where Geek placed the ADG8 on Ninja 650R bikes.

I lifted this advert from FERNO - Senarai Nama Pemasang Acumen as per the following, depending on your location :

"Senarai dibawah untuk mempromosi kawan2 kita yang boleh Pasangkan acumen DG8 pada motor pembeli.

1. Geekmy [Kota Damansara] : 012 2292 185
2. Rahman [Kuantan] : 013 9149 822
3. Azam [Subang] : 019 2592 088
4. Jason [Kajang] : 017 3344800"


Take it from me- ADG8 is worth its monies; and with this installation, I believe I have cured myself of the 7th gear syndrome that plagues many superbikers :)

Morning Convoy @ 23/9/2012

My Shoei makes a great touring helmet!
Chin guard serves its purpose well.

It was a good morning and a few friends gathered together for a quick ride up and down Genting Highlands. Having the smallest cubic capacity bike amongst the group, I was the designated front Marshall again. If I was the rear Marshall, I would have issues catching up with the bigger bikes with cubic capacity up to 1,600. So it was just as well.

Lil' Alex wanted to add more alphabets to the reflective stickers!
Once again, I earned for myself a piece of Marshall reflective stickers. That's part of the perks of being the Marshall- the stickers were cool as cucumber, and some said added 5 hp to one's bike. If you believe, then you deserve to get a cool one for yourself.


Up the mountains, there were another group of nice bikes parked together. These were from the PB Club as seen from their club stickers. Mine does not have any club stickers as yet. I guess you could say that I'm a freelancer at the moment and still earning my stripes.


Sunning the riding gears after the long ride up and down.
Lil' Alex kissing my Shoei - how sweet!